
Ever wish you could just stand next to someone full of talent and it rub off on you? That somehow what they possess would be contagious and you'd get a fatal case of it?
Those thoughts have certainly crossed my mind these past few weeks as I've surrounded myself with talented quilters, both on a local and national level.
Recently
Cactus Quilts in Texas City hosted a workshop with
Cynthia England, best known for her pieced landscapes which are highly published and have won numerous awards. Cynthia is a "home-town girl" residing in an adjacent community and has been an entertaining guild speaker at a couple of my local guilds. Her work is amazing with so many small pieces. When I discovered she would be teaching a workshop locally in a small intimate setting I jumped at the opportunity!
Pictured above is Carla, owner of Cactus Quilts, myself holding my class project, and Cynthia...okay, true confessions - that's HER class sample (sigh) and mine is only a work in progress...

This is how my project looked at the end of the workshop. Cynthia is an encouraging teacher and I can say that the entire class enjoyed our process of learning her technique. It's time consuming, but the end result will be rewarding! Ah, but another true confession, I was really wishing I could just take home the class sample - it would go so well in my beachie bathroom...
My pastor at
Calvary Houston has been teaching on the Ten Commandments and wouldn't you know it, the day following my workshop the topic was "Desire to Acquire" ....
Exodus 20:17 (NIV)
"You shall not covet your neighbor's house. You shall not covet your neighbor's wife, or his manservant or maidservant, his ox or donkey, or anything that belongs to your neighbor."
How did he know that just the day before I was desiring Cynthia's talent and wishing I could acquire her little quilt (grin)...
Okay, as Pastor Ron explained, God is NOT saying that we can't have goals, dreams, desires (I want to grow up to be a talented quilter). In reality, He wants us to be the best person we can possibly be with the talents and abilities that He has given us. What He is warning us about is being obsessed with someone else's possessions (or as in my case, the talents of others). The word covet means to lust for what is not yours.
It's easy to fall into the "If I Only Had" syndrome. Y'know, if I only had a bigger paycheck I'd be happy, if I only had a nicer home, if I only had a better car, if only I had the right clothes or the right look, if only I had the right spouse/kids/family, OR translating it to my life as a quilter, if only I had the right tools (and there's an abundance of notions and machines out there), if only I had the right fabric, if only I had the talent and imagination of so-n-sew, if only....I had all these things THEN I'd be happy.
Luke 12:15 (NKJV)
15 And He said to them, “Take heed and beware of covetousness, for one’s life does not consist in the abundance of the things he possesses.”
It's been said that multi-millionaire JD Rockefeller was once asked "How much money would be enough? and his answer, "Just one more dollar."
Truth of the matter, we brought nothing into this world, and it is certain that we carry nothing out. And so having food and clothing, with these we shall be content (I Tim 6:7-8)
Okay, so how does that translate to my life, specifically to my life as a quilter...I'll share as I share more quilting photos!
The very next weekend was our quarterly gathering of the Bayshore Longarm Quilters. My favorite part is show and tell!
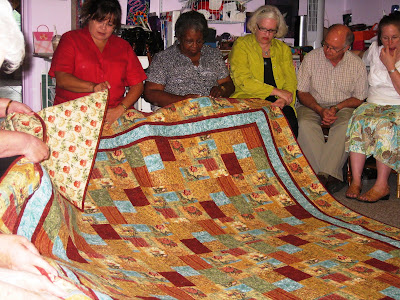
Debra is sharing one of her quilts quilted on her
A1 Quilting Machine that she's only had a few short months. I love our group - not only do we appreciate the color/design of the piecing but we KNOW to look at the quilting too! And we celebrate together the success of others.

Grace is sharing her success of this beautiful Texas quilt, one of her first "big ones" and "one of her own" done on her new A1 Longarm Quilting Machine. Grace unselfishly quilts a lot of charity quilts for the Mainland Morning Guild in Texas City. We all marveled at her creativity in her design elements, especially the hearts which she carried on to the backing fabric (deep in the HEART of Texas).

Lisa pieced this beautiful black and white quilt for her son and his wife, and since her longarm frame isn't as large as mine I was given the opportunity to quilt it for her (it's a King). She saw the completed quilt for the first time during our show and tell. It was fun to share a little of the lime-light with Lisa. I had posted on facebook that this was one of those quilts that I'd like to say "
oh, I don't know what happened to it, it must be lost" (grin) and then keep it for myself... oh my, I'm coveting again! Even jokingly.
Pastor Ron shared the application of the 10th commandment...(1) learn to be content (2) enjoy what God has already given you (3) cultivate a gratitude attitude (4) hold lightly to the things of this world - as previously mentioned, we can't take it with us! Or as Job put it "the Lord gives and the Lord takes away, blessed be the name of the Lord" and (5) be a giver - share and bless others.
That's what I hope to achieve in my quilting life (my personal life too, but this is suppose to be about quilting). I want to hold on lightly to the things of this world. I enjoy my quilting "things", I get pleasure in making my quilts, but they won't go with me...my desire is that they be inherited by my family, and the abundance shared with others (and there is an abundance, how many blankets can one person use here in hot humid Houston area). In the meantime I want to be grateful for the possessions I have, to be wise as I acquire, to be appreciative of others who will share their talent with me, who can teach me, guide me, inspire me...
Our little group of longarm quilters was blessed by the sharing of one of our talented and inspiring members, another "local" celebrity,
Tom Russell who lives just north of us in a neighboring community. Many quilters recognize Tom from his
Simply Quilts TV sessions with Alex Anderson or his nationally award winning quilts that have been featured at quilt shows (including the International Quilt Festival held annually in Houston) and in magazines. I've had the privilege of hearing Tom speak at area guilds a couple of times already and I have to tell you he weaves a spell-binding story that has you intermittently laughing at his stories of a man entering a quilt guild and everyone thinking he's in the wrong room and then being totally awed by his creations as he shares them one by one.

The Bayshore Longarm Quilters meet quarterly in my studio - I can honestly say that this gathering had the most positive responses concerning being inspired to explore and develop our individual talents. Tom, thank you again, I hope you know how much we appreciated your willingness to share with us!

Yes, I still wish that talent was contagious. I think in a good way, it is. Not if you envy or covet what someone else has or does, but when you celebrate their successes and when in turn they inspire you to do your best. Being content with what you have and still reaching for your dreams, sharing your dreams along the way so that others can help you and encourage you. I just love my quilting friends!

Okay, for the record, Tom got to enjoy all of five minutes in my favorite chair on the deck under the tiki hut (grin).

Then I whisked him and Kathy away to my favorite "vacation destination" - our local escape,
La Brisa for a wonderful lunch and time to visit..

Still mulling over the thoughts of being content and being grateful for what I have... the next afternoon I pulled out a UFO to work on...it was actually cut out in early 2008 from left over fabrics to test out a version of a pattern called
Jack's Chain only this version is called Ferris Wheel from the Vol. 6 book on hexagons by
Marti Michell whose template I used to cut the pieces.

This was all I had completed in 2008, besides all the cutting and planning that is! By the end of "my day off" last Sunday I had pieced all the little circles and partial blocks and have the quilt laid out on my "design floor" in the studio.

Were it still is a week later! Lots of set in seams with this, but I'm working through it and enjoying the process. I've having to ignore that the colors aren't turning out like I envisioned (sigh) and it looks more like someone threw little squares of color on a busy piece of fabric...oh well, not everything is a perfect plan. But I'm grateful to have the opportunity to "practice" and perhaps I'll actually take the plunge and do the original version of Jack's Chain with 9 patch squares and SOLID hexagons (grin). In the meantime, I'm holding on to this loosely knowing that I can't take it with me!
I'll end with a few critters from my backyard this week....just another reminder of God's creativity in His creation and how He provides for "the lest of these"


Knowing that He will provide for you and me too!
karen

 My sweet little forever pup has her photo in the November 2010 issue of Machine Quilting Unlimited.


