 The old saying what happens at retreat stays at retreat is a wonderful saying and at times a necessary unspoken rule, especially when one stays up until the wee hours to work on a project and may be prone to saying or doing silly things that would be potentially embarrassing if fellow retreaters shared said events on their blogs...
 As true as this may be, some things gleaned from retreats just needs to be shared! Take for example this really quick and easy method of making bias binding...
Trust me, its fast and simple! Much faster than the time it has taken to upload the photos to blogger that's for sure! So are you ready to learn something new?
Whoa-up for a moment....I neglected to discuss the fine merits of bias binding and why I've embraced this new method....
First of all, I love stripes. Don't know why, but I gravitate towards fabric that is striped. I don't care how wild it is, actually the wilder the better....I love the way it adds movement to my quilts when used in piecing and I love love love the way a striped binding finishes off my quilt.
Because of this I had to learn how to do bias binding. Ugh. I personally like the ease of straight binding, it's a no brainer to cut strips selvage to selvage to join the edges for my binding, and I tend to do this a lot....but gee, it just doesn't have the barber pole effect that I can get with stripes (once I found some fabric that had the stripe printed on the bias and I thought I'd passed on to quilter's heaven, the look of bias without the trouble!).
Okay, so I pulled out all the books on binding, all the magazines that had tips and such and I tried to make that tube-thingie that is somehow suppose to end up as continuous bias binding. All the drawing of lines, cutting with scissors, it wiggled, it didn't look like the photo, I gave up. (Hate to admit defeat, but hang on, this has a happy ending - pun intended!). So my stripe fabric stash increased for a while as I figured I just needed a little more experience under my belt, or someone to hold my hand while I attempted this method again....
Enter Houston International Quilt Festival....the quilter's shopping delight for all sorts of marvelous gadgets all under one big roof - better than a circus! I don't remember the year, but I found a gadget that solved my challenges of tubing to make bias binding - a ruler that allowed you to cut strips on the 45 degree angle from the fabric coming right off the bolt! Wonders of all wonders!
After a few trials and errors of cutting double folded fabric and ending up with stripes going opposite directions I had mastered bias binding and added my barber pole effect to many of my personal quilts.
Okay, so you are saying that you can understand the need for bias when using a pretty stripe, and we all know about the need for bias for curved quilts....So why a new method you say? If it ain't broke why fix it? you ask...because I'm proving that an old quilter can learn new tricks! And I've not only learned a new method but I've learned a why.
I like it when things are explained to me in a logical manner, one that I can wrap my brain around. I've now discovered that bias binding is truly better on any and all quilts. WHAT? Yes, that's what I said, bias is better and now with this new method I'll be making bias for all my quilts, regardless of fabric (striped or not) and regardless of scallops or straight edges.
Several of my grandmother's quilts that were made in the 1930's (and earlier) have had their bindings replaced, some circa the 70's based on the fabric...this is because the binding wore out. We've always heard that the binding is the first to wear on a quilt, and I always assumed it was because the quilt was much loved (as in drug around by a kid who didn't know any better) or perhaps because it was always being tugged to pull up closer on those cold winter's nights. Well, that's part of the reason...
The true culprit, most likely, was the binding was either folded over from the back (a lot of my grandmother's were) and/or they were straight of grain bindings. The theory is the added stress caused on the fibers due to them running parallel to the quilt - exposing sometimes a single thread (indeed, they become thread bare). As the quilt is used, loved, laundered, it wears along that edge and you are left with a gapping split necessitating replacement A bias binding, on the other hand, has the fibers running cross-ways, or on the diagonal, and that makes it stronger, especially when double folded as most of us like to make our binding. No single thread line to wear out. It also stretches (which is why we use it on curves) and that little bit of give helps with the wearing, or lack of wearing out. It's enough to make me think twice about ALL my personal quilts having bias binding stripe or not...
Okay. Ready for this new adventure? It's a twist on the tubing method but was modified at retreat as we collaborated on finding a way to make this easy easy easy...easy enough to want to use it all the time...
Start with a half a yard of your binding material ( or any size if you just want to practice).
 Lay the fabric right sides together folding selvage to selvage. Square up the two cut sides as well as remove the selvages. Leave it folded in this manner and move to your sewing machine. Sew a quarter inch seam allowance on the three open edges, do not sew through the fold. (One big U shaped continuous seam - sew cut edge, turn corner, sew selvage edge, turn corner, sew other cut edge, stop, do not sew across fold).
 For photo purposes I've marked the corner where I turned so you can see the edges. It does help if you do this too so you have a visual for the next step. You can use a blue wash-away marker or a sharpie, it doesn't matter, it won't end up in your finished product. Trust me. Make it easy on yourself, none of those pale pencil lines that you struggle to see (or at least my eyes have a hard time seeing them).
 I also marked the folded edge (photo below) These got a little out of order... Above you can see where I'm lining up my ruler to go between the 90 degree angle made by my quarter inch seam.
 And I've lined up the ruler with the corner that was made with the folded edge and my quarter inch seam.. Draw a line from these two points. Go ahead, use that sharpie, I promise it's okay.
 Now here comes the tricky part - you know, where you have to hold your mouth just right to do it. Pick up the piece by the bottom two corners and flip it to the other side (turn it over). Then mark your corners as above and draw another diagonal line.
  If you are chicken to use the sharpie before fully understanding if you indeed held your mouth just right and flipped the correct way, then take a gander at the next photo...
 To double check to see if your drawn lines are going the correct way, when you take a peak at the other side the line will be going the opposite direction - where if you were to hold it up to the light you would see that the two lines make an X. Does that make sense? See, it's easy, and trust me, that's the hardest part of this entire tutorial. So be encouraged!
 Next you are going to take a pair of scissors and lift up the top layer, make a little nip on the line to be able to insert the blade of the scissors and cut through ONE LAYER ONLY on that drawn line (see, told ya' the sharpie wouldn't be in the finished product).
 For now, just sorta ignore those corners. Don't clip through them, just up to them... It should look something like this:
 Next flip it over and repeat the process, making a slit to insert your scissors and making sure you only cut through one layer.
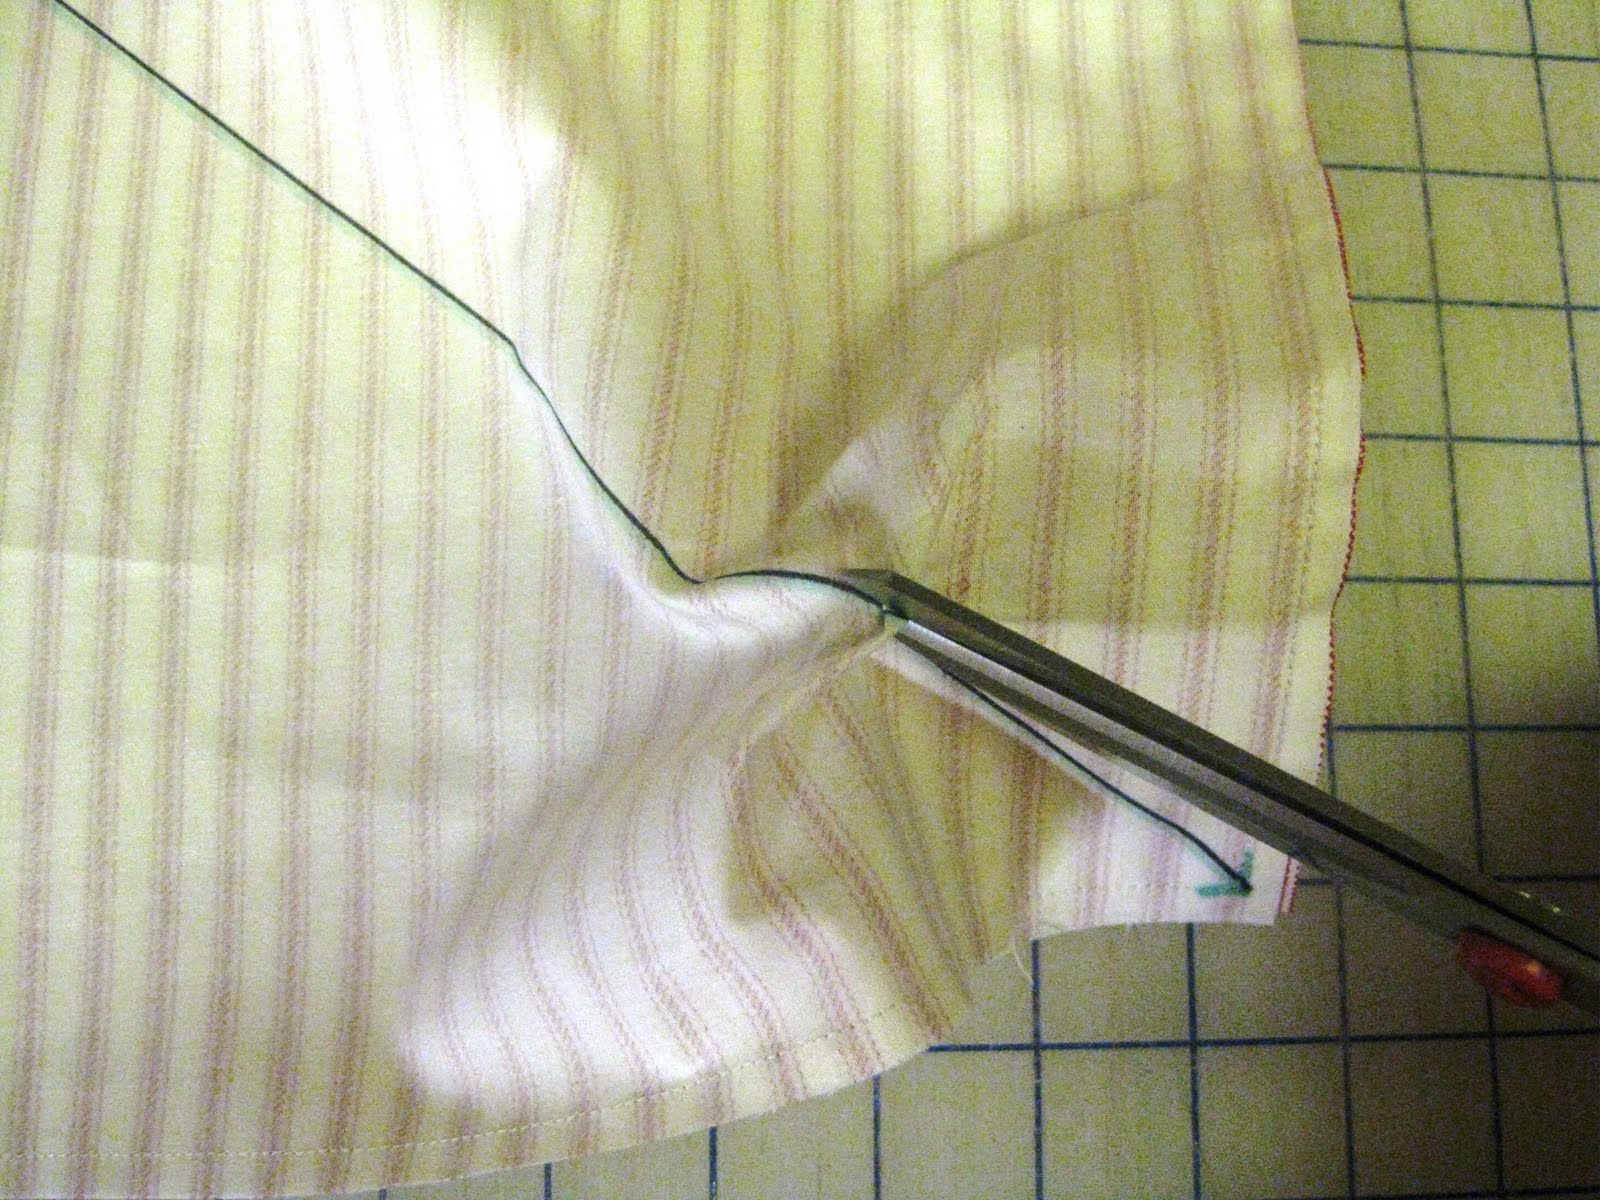
 When finished it will look like this, sorta crazy, but trust me, this works.
 Start to give it a little shake...
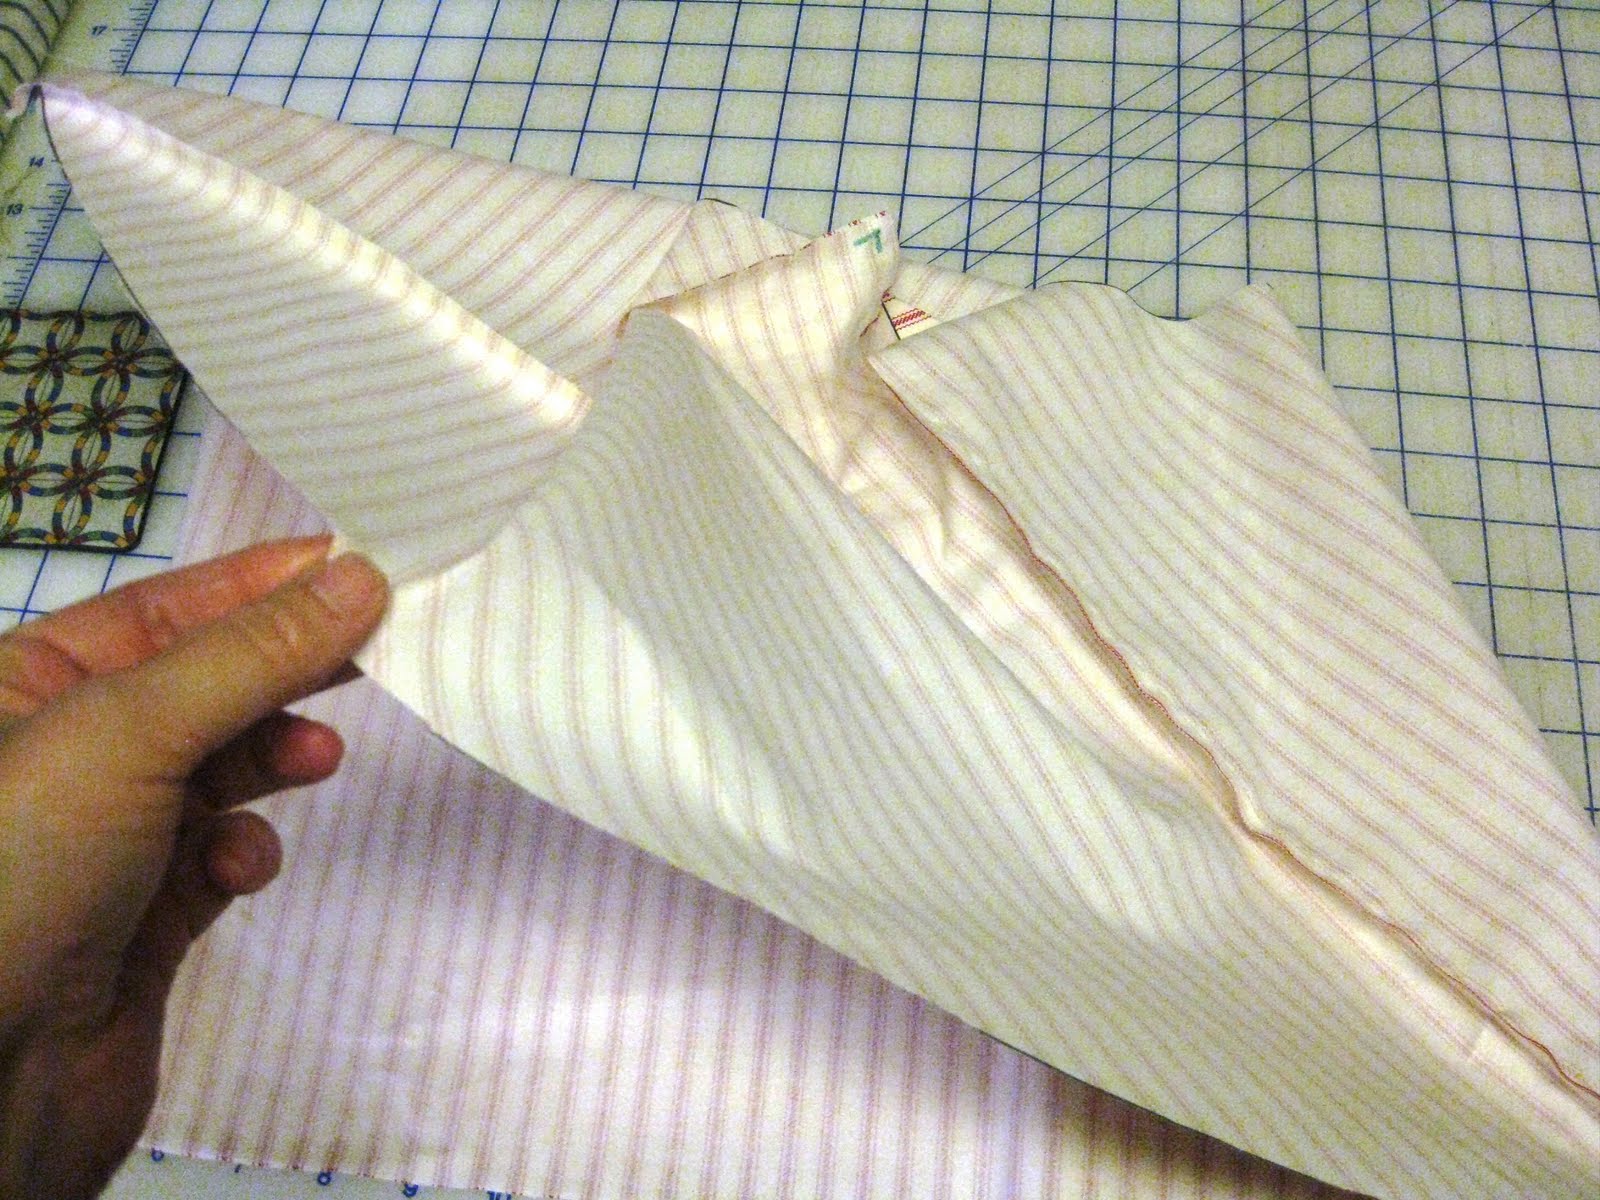 Pick it up and you'll discover you have one of those tube-ie things.... but wait! This method truly is different. You've made it this far, keep reading!
 Shake, tug, pull, or do whatever to make it lay out like this on your cutting table. Yep, it's a tube alright, a bias tube...would ya looka there!
 Time to do a little ironing. Rolling around as necessary (the tube, not you silly) press open the seams.
 It's going to get a little strange when you come to those corners that you didn't quite know what to do with when cutting the diagonal line.. I don't quite know what to tell you to do with them here either...don't worry, this is okay. Just press your best around it (and ignore the goofy part, it too will all work out in the end).
 Once the seams are pressed open, again lay out the tube on the cutting mat.
 It's now time to square up the edge and begin to cut the bias binding... (ah ha! this is where those goofy corners get trimmed off and they shall bother you no more!)
 Okay, up until now you're thinking This is just making a tube, maybe a little different than other ways but come on, what's so new about this... and perhaps you are right. Well, right on it being a tube that is. The difference really happens from here on out. There are folks much smarter than I who can tell you how to cut this where the bias is one continual strip,drawing lines and such, but that's not this method. This is where the retreat brain-storming came in... we did it a little different and a little less confusing... ready?
 After squaring up the edge and making sure the tube is laying flat, you are now going to cut strips just like you do for straight edge binding. Yep. That's what I said. Cut strips. All the way from the bottom to the top. Just like strip cutting for piecing or straight edge binding.
 I cut my 2 1/4 inches but you can cut yours whatever your favorite binding width is.. when you are done, it will look like this:
 And when you open one up, you have a circle of bias binding. Amazing. And totally not what you expected, or what you need to bind your quilt. Hold your horses, there's more. (but wait! there's more!)
 Now it's time to do a little unsewing, or frogging (rip it rip it). I know, it's not a quilter's favorite thing to do, but it works. Trust me. Find one seam on the circle and open it up.
 Oh joy! You now have a bias strip with the ends cut at the 45 degree angle making it easy to join to all the other little circles of bias that you will be unsewing...are you beginning to see the light at the end of the tunnel? I promise it's not a train!
 See, this looks familiar now doesn't it? Simply take the ends of these strips, join them together and you now have continuous bias binding from a tube without all the confusion of drawing lines to make it come out right...
 How easy is that? Okay, here's my disclaimer... you will end up with a strip or two that will have these goofy looking seams (see below). That may or may not bother you...
 If it does, then simply cut the offending section out, using a 45 degree ruler...
 Making sure to cut both sides with the same direction on the ruler and not the direction of the seam - otherwise they don't want to sew together nicely (voice of experience speaking).
 And for those of you who really hate to frog (unsew) you could actually cheat and cut across the seam and none of us would be the wiser (what happens in the studio stays in the studio). Much faster to cut than rip...the choice is truly yours.
 Occasionally there are little flaws in a well laid plan. Not even going to worry my busy little brain over trying to figure this one out, but gee, the angles are going the wrong way and I can't sew them together nicely... what to do, what to do?
 Whack it off and make it play nice! After all, you are the boss!
 Just make sure that both sides are going the same direction and you can continue to piece your merry little heart away.
Oh, and did I mention that these little cut off parts make great additions to your stash collection? Little triangles of stripe make for interesting conversation pieces in your next scrap quilt. Waste not, want not..
 By the time you have sewn all the parts and pieces back together you have this wonderful pile of bias binding that's just itchin' to get you stitchin' this luscious bias binding on your beautiful quilt!
 Even with my little trimming boo-boos I still ended up with over 350 inches of usable bias binding from my half yard of fabric. ( Actual length varies upon the width of the strips) It was quick, painless, you didn't have to worry with drawing lines on some tube to make it continuous, and you were able to make quick use of a rotary cutter to make the strips all the same size...and with a little pressing and folding I ended up with the roll of beautiful candy-striped bias binding that you saw at the beginning of this long winded ramble.
See, I told you it was quick and easy. Much faster than the time it took to tell about it! I hope you enjoy my sharing the secrets of discovery from my last quilting retreat. Thanks to my group "Quilters Autonomous" for being so giving, creative, and sew much fun!
Karen
16 comments:
Thanks so much for taking the time to put this tutorial together, Karen! You can bet I'll be trying this out!
Thanks for taking the time to read it and consider the possibilities Denise. This gave me something to do yesterday while my studio is in limbo preparing for some remodeling.
Just learned that my tutorial was linked on FaveQuilts.com A nice place to visit for inspiration...check them out!
http://www.favequilts.com/Binding/How-to-Make-Quick-Bias-Binding#
Oh Oh thanks bunches, I saw this somewhere (not as well done or I would have remembered)and now I have a place to come to, to remember it any time I need it.
Karen, I LOVE your tutorials, they are both informative and entertaining to read. You are truly a gift to the quilting world!
Gudrun, bookmark this and I hope you come back often. It's a time saver that's for sure.
Leslie, my proud Louisiana A1 girlfriend - I'm glad I'm entertaining! Don't know about the gift part but thankful that you read my rambles! Hope to see you soon!
Hi Karen,
I'd like to try your method, but I have a question. It looks like you are working with a square when you have your fabric folded selvedge to selvedge. If I start with 7/8 yd, fold that selvedge to selvedge, when I mark the line from corner to corner, it won't be on a true bias. It's more like a 60 degree angle, rather than a 45 degree angle. Is that okay, or should I work with a shorter piece to be marking on a 45 degree angle?
I tried very hard to find a phone number to call you, checked on your website, searched for your name on Superpages.com. Found a number, but no one answered.
Now I guess I have no choice but to go after the weeds in my garden while waiting to hear from you. Good thing it's a nice day (after several very hot ones).
Eileen, I went to my "source" Dwain is the one that taught this method at our retreat so here's his comments:
"First, if using 7/8ths of a yard, you have a piece of fabric that is 31.5 inches long and depending which way it is folded and the width of fabric you may have close to a square. I try for a rectangle that will give me a square. I don't think it matters much whether the angle is 45 or something else. What matters is getting the thread running diagonally. Others may disagree. I haven't used this method long enough to gauge durability. I think it is better than cross grain or straight grain."
Thanks Dwain, it's all about sharing the journey AND you are a great one to share it with (grin)
Brilliant tutorial, and quite funny too :p
I was going to ask the square question but someone has already beaten me to it.
Thinking about it a bit more I am going to go for a square as using check material and is likely to look weird with it at an angle other than 45 deg. But im sure it would be ok for other designs. :D
The best part was the "But WAIT! That's not all!" The way you explain that you can make circles and then unsew/sew them back together is wonderful! That way, the stripes are perfect, and don't go "just a bit off."
Thanks for doign this!
Janet in Pa, thanks, perfect instructions
I just followed your tutorial to make binding for a Christmas tree skirt (for my mother in law, so it had to be good!). Worked like a charm! Thanks so much for posting. Can't wait to snoop more around your blog.
I found you by googling bias binding with stripe fabric. Thank you so much for being out there in cyberland as it is a huge help in the quilt I am about to bind with stripes on the diagonal. I am no longer worried about messing up my binding fabric. Thanks again. Ann
Thank you so much for this post, Karen! It is a wonderful and easy way to make bias binding with striped fabric and not have to worry about having the stripes being off. I know it will also help out in binding some sewing projects too. Thank you again for the awesome tutorial!
Paula
I LUV binding with stripes!
It really helps to blend the quilt front with the back and since it's a double thickness bias binding it is supposedly more durable.
Thank you for your tutorial!
I will be binding a quilt with scallops and can't wait to give this "new" technique a try.
I've got a red and white cotton ticking style fabric for the binding.
I am just starting out quilting and have been searching tutorials for everything that I may have a problem with. I am teaching myself and have a lot of friends who quilt. I have attended quilt retreats and helped other quilters with their projects so I could get some hands on experience before jumping into the pot so to speak. I love that you ramble because I ramble. I learn better with all of the extra rambling that most people get annoied with. I will be checking out more of your tutorials that you have posted. I found this in a link from FavQuilts.com. Thank you for the information. I will be adding this to my collection of information!!!
Amy
Post a Comment