Showing posts with label feather tutorial. Show all posts

Saturday, January 9, 2010

The First Week of the Rest of My Life


I love the opportunity for new beginnings. Sundays are my all time favorite day of the week because that is my time for refreshing and worship. I count Mondays as good too because even though technically they are the second day of the week I think of them as the first day of my work week and I'm always eager to see where the week will lead me. The first of a month is fun because I get to turn to a new page on my calendar, there's a whole clean slate and days waiting to be filled - an opportunity to write my own history. New years are the epitome of newness. All of these are opportunities to start over, to put off the past both the joys and the failures, and to look with anticipation of the new day/week/month/year. The first day of the rest of my life awaits me fresh each morning. A day full of choices. My goal is to chose JOY!

I also like starting a new quilt. And what fun when I can start a new one on Monday and watch it's progress during the week. It amazes me how a pieced top can change so much while it's on the quilt frame. Little by little, row by row, stitches are added in an effort to complete the quilt. The hard part is being patient - I want to see how it's going to turn out! But that takes diligence, focus, and just plain hard work to put all those stitches in so I can "visualize" the finished quilt. (Sad thing, unless I'm doing the binding I really don't get to see the final quilt, as the binding adds another finishing design element to the quilt, but that's another rambler story!)

It's a new year and I'm ready for new things. Can't imagine what the future holds, but I know Who holds my future! It's a trust thing for me. Faith.

I also like new design elements and fresh ideas for my quilting. It's good to review things of the past and then see how to improve upon them, to grow with my passion. That happened this week with a new little design I like to call "Feather Puffs"


The design is a spin off of one of Irena Bluhm's designs. I have to admit, it's also a spin off from a scene in the movie Avatar. A small disclaimer here, while I enjoyed the movie for it's creativity and special effects I didn't like all the hidden messages including the pantheism - that of nature and God being equivalent. Tree hugger I'm not. But! With discernment I really enjoyed the visual sites in this movie including a beautiful seed pod that floated through the air, pretty much like blowing of a dandelion seed pod as a child and watching it take flight, with the added grace of jellyfish/sea anomee like movements.

It was with these thoughts that I decided to play around with adding "feather puffs" on the quilt gracing my frame this week. The one above became the design element in the chain blocks and little minature 'puffs' were sprinkled in along the border. The movement in these elements was very joyful and freeing this week. I was quilting in my element and enjoying the process.


I also wanted to take some photos of how I do feathers. The other day I mentioned in My Garden Grows Feathers how much I enjoy feathers and have worked really hard to learn many different types. So here's a little taste of how a formal feather plume grows under my hand guided longarm.


Basic stitched stem/vine/spine
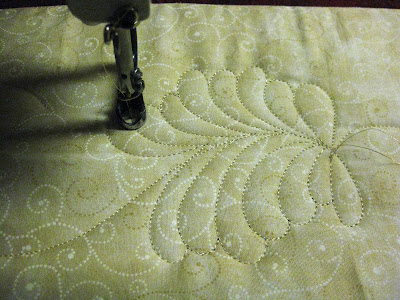

I start in the middle and work my way towards the curl.
These are formal feathers sometimes called over the top
or hump and bump because every other one has
to be back tracked over the hump to form the following plume.

I like to work both sides of the stem instead of going down one side
and then back up the other. I think it's faster and funner (grin)

Once I've reached the curl I retrace or back track over the spine back
to the center and do the other side


Once the feather design element is complete I then add background filler
so it's not just floating out there (grin)


This is the completed quilt.


and close ups


The customer picked up her quilt today and expressed her pleasure, which of course completed my pleasure. Happy ending (grin). Actually, it's just the beginning for this quilt, it now needs to be bound and prepared to hang in a local quilt show next month, which I hope to attend!


So going back to the thought of improving with time...what do you think? Here's my feather of 2010 and..


here's my feathers of 2006 from a quilt called Purple Passions Unleashed


I'd like to think that I've improved with age (big grin)
and the best is yet to be!
After all, it's the first day of the rest of my life!


Friday, April 24, 2009

Tools of the Trade - or "Back in the Saddle Again"

As in "back in the longarm SADDLE STOOL" and quilting as desired! I thought it would be fun to take photos and 'document' what I did today as a sort of tutorial or demo of the quilting on this customer quilt. It may give some of you ideas to try something on your own longarm or it might give those of you that send out your quilts to a professional to have an inkling of the behind the scenes.

For whatever it's worth, here's my play by play report on today's progress.

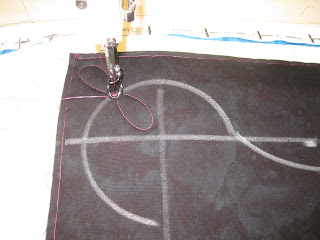
The border of this quilt is to be formal feathers, sometimes referred to as "over the top" feathers. This is a look that is suppose to mimic hand quilted feathers (or so they say -- who are those they sayers anyway?) I have lots and lots of rulers and templates in my longarm tool stash and have found through the years that I really prefer to use them to mark my quilt with instead of actually attaching the extended base and using them to quilt up against. It's not as perfect chalking them as I do tend to get off the lines every now and then, but once the chalk is erased no one knows (tee-hee).


I marked the center of the border with a line and then used one of my rulers to make the soft wave and one of my circle rulers to make the 3/4 corner.


Nothing special or fancy about the start, just a figure 8. Then away I go!


I like to 'go spineless' - a term coined by Lisa Calle. I highly recommend her DVD and workbook Feathers of a New Generation One reason I like this method combined with the chalk spine is that I don't have as much thread in the center spine -- it also allows me to work on both sides of the spine and work my way down instead of doing one side, back tracking, and doing the other line. Let's face it, some days are good back tacking days and some aren't.


I never know exactly how things are going to turn out until I'm done. I use the Cotton Picker to 'erase' the chalk lines and take a look to see if I passed (grin). Like I said, every time I do this it's unique, depends upon my mood, if the dog barks at the UPS man and scares a bump in my quilting or if I'm hitting the back tacking good or not. I know the gals with computers can do this perfectly, but I enjoy the creativivity and individuality of each project. I hope my customers do too.


I don't know if you can see it or not, but the feathers work their way from corner to center meeting in the center. This allows me not to have to worry if the waves work out or not (up, down, up --- do they work out evenly and meet in the middle to form one line or not -- I've eliminated that with this method). This also makes it easy for me to work down the sides and eliminate turning the quilt (sometimes I do have to turn, but not this design). And another benefit of the spineless feathers working both sides is I can stop without a big notice in the break of my stopping. Once I do the interior I'll advance the quilt and take up on the border where I left off until I come to my middle point on the side that I previously marked. Hope this makes sense.


Okay, on to the center. This customer drew out a pomagranate and asked if I would quilt that in a contrasting thread in each snowball block then do some feathers or something around the rest of the setting. I audition designs with a dry erase marker on a sheet of clear plastic that I've lined with purple duck tape (as a visual stopping point so I don't mark on the quilt top - dry erase marker DOES NOT come out, ask me how I know!) Sometimes I do what I draw out and sometimes I don't. Most of my customer give me a general idea of what they want and then allow me to interpret it my own way. I work best that way, as I never know what I want to do until I start doing it, and even then sometimes I change my mind! Fickle female, that's me!


Oh, I wanted to show you something here -- my A-1 Quilting Machine has adjustable handlebars called EurgoGrips. When I am doing ruler work, like this stitch in the ditch around the snowball, I can totally move the left hand control out of my way so I can hold my ruler. Each of the handlebars are indendandly adjustable in countless directions and arrangements assuring me total comfort no matter what I'm doing. A nice feature if you are doing research on longarm features (and there are sooo many more that I love about the A-1 but lets get back to the other tools of the trade). On this quilt I decided that I needed to stabilize the snowball with SID (stitch in the ditch) because I will be ignoring it for a while as I work through one color of thread all the way down the quilt and then re-roll to come back and do the pomegranates in a different color. Without stabilizing it I run the risk of the batting bunching up or the backing puckering. An added step but worth it in the long run.


The SID completed for the amount of quilt area available on my frame I then audition another tool to see if it's something I think I might want to use as a design element. My clear plastic and dry erase marker are one of my most used tools of the trade.


Yep, I think it will do, don't you?


Next I did some longarm feathers, also known as Jamie Wallen's Feather Flurry. His designs have influenced a lot of my quilting and I highly recommend his DVD! He has been a guest teacher in my studio in the past and will be giving workshops again here this summer.

Well, one row is complete, time to advance and start on the next row....but that will be in the morning. It's Friday night -- date night! Looks like tonight it's leftovers with a rented movie, but hey, it's still a date! Hum...maybe there will be popcorn later -- who knows!

Happy Friday night everyone!