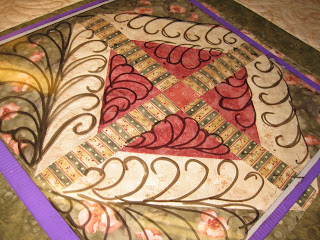
Currently I am working on a beautiful 12 block sampler. It's a huge quilt, 94 x 118. The blocks are set on point with 15" alternating blocks and setting triangles that leave a lot of room for beautiful heirloom feathers -- something I dearly love to quilt!
As mentioned in a previous post, it takes quite a while to load a quilt prior to ever taking the first stitch. This quilt, including some marking of the large blocks prior to loading, took 2 hours before I was able to start the quilting process.
Here's a photo of the quilt draped over my frame prior to loading.
I first used a mononylon thread to stitch in the ditch (SID) to stabilize the quilt as well as add dimension to the overall quilting process. I prefer to use the "invisible" thread especially when the adjoining colors are so contrasting. Hides a multitude of sins. Especially if the seams are not properly pressed to provide a proper ditch to stitch in. This varies from quilt to quilt and even within the same quilt, so best to err on the safe side and use invisible thread. SID is not hard, just very time consuming and requires an extended base and ruler for the process - which took almost 4 hours. Lots of stops, starts, and advancing the quilt on the frame. Not to mention the wear and tear on my neck and shoulders from keeping a constant speed and constant pressure on the ruler to assure as straight lines as possible. It's my least favorite part of the quilting, especially since I blew out my shoulder last year loosing range of motion for about 2 months, but an heirloom quilt demands no less! It's what I would do on my own quilt, and my motto is to treat every quilt as if it were my own.
This particular quilt will have multiple thread changes -- I prefer to use a matching thread to assure that the quilting is complementing the piecing and not over taking it. Sometimes the quilting is king sometimes the piecing. A lot depends upon the quilt and the customer's taste. As I've quilted numerous samplers for this customer, I know she prefers matching thread.
Since the quilt is now stabilized I can advance it back and forth without the worry of puckers or pleats in the quilt top or back, thus allowing me to work with one color throughout the quilt before having to change thread colors. Had the quilt not be stabilized I would be limited to the exposed area on the frame and would be changing thread colors numerous times throughout the quilting process. Advancing to the next area, and repeating all over again.
Today I worked on the cream colored areas of the quilt. I don't have a photo of the alternating blocks, will take that tomorrow. But I do have a photo of how I audition designs.
I have a clear piece of acrylic that I use like a dry erase board. I placed blue painters tape along the edges as a visual reminder to NOT draw on the quilt top -- dry erase markers do not come out of fabric (ask me how I know). I then place this drawing surface over my quilt and doodle. Trust me, I quilt better than I draw.
Once I decided on the design for this setting triangle I then used my circle templates and marked the spine with a blue water soluble pen to keep the design for all four corners consistent.
I then freehanded the feather design, working each corner one after another in an effort to remember the design and keep it fairly consistent - as consistent as one can be free handing!
Once my large blocks were done I began to work on the 12 blocks. Remember, I'm working with the cream colored thread only. As I come to each block I need to come up with some sort of idea of how I want to quilt it. I doodle, erase, and doodle some more. Everything is "inspired" and done at the machine, I'm not one to draw out the whole quilt ahead of time. My customers trust my instincts and allow me the freedom for their quilt top to become my canvas for my "art". It's always a challenge to come up with something new on each block - but that's the beauty of a sampler and the fun of being the quilter.
Since there will be multiple color changes and since I don't have the best memory, I take a photo of my design so when I come back to that block with the second color I remember what I previously decided I was going to do with that block....here are a few of my plans that I will implement tomorrow as I continue to work on this quilt.
Stay tuned for more photos of this quilt. After the blocks are done I will then do the borders. This particular quilt requires "turning" -- a process that will be explained later.


2 comments:
Karen - great description of your "process" for this quilt!
Beautiful feathers! I like the tip about taking a photo of what you have done so you don't have to keep rolling back to refer to it. This one is going to be a beauty.
Post a Comment